@Sangemdoko , silly question, will modify and NCalc allow for conditional expressions involving say ?/If. ?
You are using an out of date browser. It may not display this or other websites correctly.
You should upgrade or use an alternative browser.
You should upgrade or use an alternative browser.
Ultimate Inventory System WIP
- Thread starter Sangemdoko
- Start date
@Duffer123
I'll let you all know once the early access is available... don't expect it any time soon though.
In terms of modify and NCalc here are the function that NCalc supports (simple if else is supported):

 github.com
We will start with NCalc. If a lot of people start asking for more complex logic in modify we may look into switching to something more complete like Lua. That's not a priority though since NCalc should cover most people's needs.
We will recommend against using the modify feature on items at runtime, because NCalc and regex create garbage. Instead it's better to use static C# functions that you would write to composite attributes together. I'll recommend using the modify feature for ItemCategory and ItemDefinition attributes as they should not be changed at runtime and therefore their values can be "pre-Evaluated" inside the editor or at the start of the game during load time.
I'll let you all know once the early access is available... don't expect it any time soon though.
In terms of modify and NCalc here are the function that NCalc supports (simple if else is supported):
Functions
Mathematical Expressions Evaluator for .NET. Contribute to ncalc/ncalc development by creating an account on GitHub.
github.com
We will start with NCalc. If a lot of people start asking for more complex logic in modify we may look into switching to something more complete like Lua. That's not a priority though since NCalc should cover most people's needs.
We will recommend against using the modify feature on items at runtime, because NCalc and regex create garbage. Instead it's better to use static C# functions that you would write to composite attributes together. I'll recommend using the modify feature for ItemCategory and ItemDefinition attributes as they should not be changed at runtime and therefore their values can be "pre-Evaluated" inside the editor or at the start of the game during load time.
@Sangemdoko , thanks for the swift response and looking forward to your next formal update. Haven't thought through Modify as much I should but was wondering how your response would tally with attachments, sockets and affixes (item customisation) at runtime. However, I think they're probably addressed by Item[] which I presume would be one type of first release Item Attribute... I do think NCalc more than sufficient for it's purposes though...@Duffer123
I'll let you all know once the early access is available... don't expect it any time soon though.
In terms of modify and NCalc here are the function that NCalc supports (simple if else is supported):
Functions
Mathematical Expressions Evaluator for .NET. Contribute to ncalc/ncalc development by creating an account on GitHub.
We will start with NCalc. If a lot of people start asking for more complex logic in modify we may look into switching to something more complete like Lua. That's not a priority though since NCalc should cover most people's needs.
We will recommend against using the modify feature on items at runtime, because NCalc and regex create garbage. Instead it's better to use static C# functions that you would write to composite attributes together. I'll recommend using the modify feature for ItemCategory and ItemDefinition attributes as they should not be changed at runtime and therefore their values can be "pre-Evaluated" inside the editor or at the start of the game during load time.
@Duffer123
I'll give more information on sockets, affixes, etc... and much more in the next formal post. Hopefully, it'll clear up any worries you have.
I'll give more information on sockets, affixes, etc... and much more in the next formal post. Hopefully, it'll clear up any worries you have.
Part 1 : Introduction + Recap
Hello Everyone,
It took a while but I am back with an update on the progress of the inventory system. We have now started to implement most of the launch features and I will present my solutions to you here. I have been listening and taking note of all your feedback and requirements and I hope you’ll find all of it very exciting. We are far from being ready to release the asset though, we haven’t started the integration with UCC and we need to fix bugs, clean the API, write the documentation and work on the performance.
I have heard that a lot of people want to get their hands on this asset as soon as possible, so we made a few changes in our plans for the launch content. We also plan on releasing an early access at some point once we figure out how the UCC integration will work, not before as it may require some big changes in either or both of the assets. I’ll mention in more detail what we would like to be there at launch at the end of this series of posts. Be warned that any of the statements we make here are not guaranteed. Things could change at any time, we’ll keep you all informed if that’s the case.
Introduction
As stated before, this is a stand alone asset, which means it will be usable on its own and will compete with the other inventory solutions on the asset store. We are bringing a solution that we believe is powerful, flexible and scalable while still being extremely easy to use, even with minimal programming knowledge. When it comes to items and their attribute values we believe that iteration time must be reduced to a minimum as it allows the creators to spend more time on the creative parts. Once a category of item is defined it should extremely easy to add/remove/change items.
Once again I would appreciate your feedback on the framework design, component namings, and on the Editor UI. Please let me know of any of your concerns on the subject and the limitations you encountered on other systems, which you would like to be addressed here.
If you read the first two posts you will see that we have made some changes to the requirements and goals. Be advised that any of the following statements can change, but the main idea will stay the same.
I will split the content of the update in multiple posts as it won’t fit in one post.
With that out of the way please let me introduce the Inventory System plan V0.3:
Inventory System
The Inventory system is an asset made by Opsive that will help developers create their own inventory system for their game. Inventories can vastly change from one game to another. We do not plan on creating all possible inventory systems, instead we give a powerful modular and scalable framework that can enable anyone to make a complex inventory system in no time.
Key information
Our goal:
Make an inventory framework that is modular and scalable. We are aiming at enabling our customers to create all types of inventories with ease. The asset should be usable by non-programmers to create standard inventories you find in popular games. But the true value comes from being able to extend the framework to create your very own unique inventory system.
I believe the best way to achieve this goal is to create a powerful core framework and polish it by using it in real world scenarios. We will build a demo scene using your feedback and your requested features. This will ensure that the framework is flexible, modular and scalable. I truly believe that the only way to know that a tool is good is by using it in multiple real world scenarios. So having you all use this asset and giving feedback will shape it to be extremely powerful.
Target audience :
Non-programmers for people who want to create any types of items while taking advantage of the demo components to create interesting inventories.
Experienced programmers and beginner programmers who are dedicated to read our documentation and follow our tutorials to extend the demo components or write their own using the inventory system framework.
Unity Version :
The minimum version will be 2019.1. We have decided to take advantage of the new Editor UI, UIElements, to create the editor window, it did not make sense to create the Editor UI twice just so it could be used on older Unity versions. Especially since by the time we release this tool most developers will have moved to 2019.X-2020.X
Recap from last post update
During the last post I explained that you create items in the editor window using ItemCategories, ItemDefinitions and Attributes. You use item categories to structure your itemDefinitions. The ItemDefinitions can be thought of as templates for an item. And finally the attributes are the properties your ItemCategory, ItemDefinition or Item (i.e Icon, heal amount, Description, etc...).
Categories and Definitions can be nested and by doing so the attribute values can be inherited or even modified using a combination of the current object and the parent object attribute values. This allows for a lot of flexibility and speeds iteration as changing a single parent category or definition can affect many others.
Once you have an itemDefinition you can add it to an inventory component in the inspector window. All “Item” attributes can be inherited, modified or override directly in the inspector for the specific item instance that was added to the inventory.
All the items in the game is managed by an Inventory System manager. The manager will assign IDs to the items that are created at runtime and will have a reference to all ItemCategories, ItemDefinitions and Items. These can be fetched by ID or by name.
For more details, make sure to referer back to the previous post. It contains examples and gifs on how all this is done.
Coming up
In this update I will show some of the demo art and scripts. All of it will most likely change , especially the art and the UX, so don’t take anything to heart. I’ve been using the demo just to try things out so it’s not optimized and the UI looks a bit weird. The only purpose here is to show you the progress I’ve made so that you can give me feedback on the newly implemented features.
In case you haven’t read the previous posts, the demo is 2D with sprites. I’m inspiring myself from old school JRPG games, where you have a party of 4 characters each having their own equipment while sharing the party inventory.
The focus of this asset is the inventory and how the items are managed. It does not focus on wielding those items. There are some interactions that we do think useful though such as picking up items. But that’s only really for the demo and therefore 2D.
Once we start the UCC integration we’ll look into all the 3D stuff. This way by the time we’ll finish we’ll have a few examples of simple interactions, like itemPickup, working in both 2D and 3D.
Let’s start with a change in the attribute system
PreEvaluate
During our tests we found that using NCalc and Regex to evaluate the modify expressions of attributes is somewhat slow and creates garbage. So we decided to add a field to the attributes which lets you preEvaluate the attribute values in editor or once in game instead of reEvaluating the expression each time the modified attribute value is fetched. This is extremely useful for attributes on the ItemCategories and ItemDefinitions which shouldn’t change at runtime. It also works well for Immutable Item attributes. Now when it comes to mutable items it’s preferable to take another approach. Since the mutable item attribute can change at anytime preEvaluating the modified attributes will cause issues because an attribute may be dependent on an attribute which can change at any time. Therefore we suggest you to write your expressions directly in C# code instead of using the Modify feature. This also gives you a lot more flexibility.
Here is an example of using of using a static function to get the “Attack” power of a weapon which has a “BaseAttack” and a “Modifier” attribute.
If you are wondering what “ExampleDatabaseNames.Weapon” is, it’s a script that is auto-generated by the editor. It contains all the ItemCategory, ItemDefinition and attribute names of your InventorySystemDatabase in an organized manner. These are all constant strings.
Note that here we assume that the attributes “BaseAttack” and “Modifier” do exist on the item. If they do not we’ll get an error here.
You could check if the attributes exist before getting them
Or you could check if the item is part of a certain category to make sure the attributes do exist on the item.
As explained previously the categories specifies the attributes which its items must have. Therefore if a category inherently contains an item that item must have all the attributes specified by it. In this case “BaseAttack” and “Modifier”.
Hello Everyone,
It took a while but I am back with an update on the progress of the inventory system. We have now started to implement most of the launch features and I will present my solutions to you here. I have been listening and taking note of all your feedback and requirements and I hope you’ll find all of it very exciting. We are far from being ready to release the asset though, we haven’t started the integration with UCC and we need to fix bugs, clean the API, write the documentation and work on the performance.
I have heard that a lot of people want to get their hands on this asset as soon as possible, so we made a few changes in our plans for the launch content. We also plan on releasing an early access at some point once we figure out how the UCC integration will work, not before as it may require some big changes in either or both of the assets. I’ll mention in more detail what we would like to be there at launch at the end of this series of posts. Be warned that any of the statements we make here are not guaranteed. Things could change at any time, we’ll keep you all informed if that’s the case.
Introduction
As stated before, this is a stand alone asset, which means it will be usable on its own and will compete with the other inventory solutions on the asset store. We are bringing a solution that we believe is powerful, flexible and scalable while still being extremely easy to use, even with minimal programming knowledge. When it comes to items and their attribute values we believe that iteration time must be reduced to a minimum as it allows the creators to spend more time on the creative parts. Once a category of item is defined it should extremely easy to add/remove/change items.
Once again I would appreciate your feedback on the framework design, component namings, and on the Editor UI. Please let me know of any of your concerns on the subject and the limitations you encountered on other systems, which you would like to be addressed here.
If you read the first two posts you will see that we have made some changes to the requirements and goals. Be advised that any of the following statements can change, but the main idea will stay the same.
I will split the content of the update in multiple posts as it won’t fit in one post.
- Introduction + Recap
- Inventory + Item Action
- Currency + Shop
- Item Container + Save/Load
- Equiping Items + Upgradeable Items
- Crafting + Recipes
- Conclusion and what’s next
With that out of the way please let me introduce the Inventory System plan V0.3:
Inventory System
The Inventory system is an asset made by Opsive that will help developers create their own inventory system for their game. Inventories can vastly change from one game to another. We do not plan on creating all possible inventory systems, instead we give a powerful modular and scalable framework that can enable anyone to make a complex inventory system in no time.
Key information
Our goal:
Make an inventory framework that is modular and scalable. We are aiming at enabling our customers to create all types of inventories with ease. The asset should be usable by non-programmers to create standard inventories you find in popular games. But the true value comes from being able to extend the framework to create your very own unique inventory system.
I believe the best way to achieve this goal is to create a powerful core framework and polish it by using it in real world scenarios. We will build a demo scene using your feedback and your requested features. This will ensure that the framework is flexible, modular and scalable. I truly believe that the only way to know that a tool is good is by using it in multiple real world scenarios. So having you all use this asset and giving feedback will shape it to be extremely powerful.
Target audience :
Non-programmers for people who want to create any types of items while taking advantage of the demo components to create interesting inventories.
Experienced programmers and beginner programmers who are dedicated to read our documentation and follow our tutorials to extend the demo components or write their own using the inventory system framework.
Unity Version :
The minimum version will be 2019.1. We have decided to take advantage of the new Editor UI, UIElements, to create the editor window, it did not make sense to create the Editor UI twice just so it could be used on older Unity versions. Especially since by the time we release this tool most developers will have moved to 2019.X-2020.X
Recap from last post update
During the last post I explained that you create items in the editor window using ItemCategories, ItemDefinitions and Attributes. You use item categories to structure your itemDefinitions. The ItemDefinitions can be thought of as templates for an item. And finally the attributes are the properties your ItemCategory, ItemDefinition or Item (i.e Icon, heal amount, Description, etc...).
Categories and Definitions can be nested and by doing so the attribute values can be inherited or even modified using a combination of the current object and the parent object attribute values. This allows for a lot of flexibility and speeds iteration as changing a single parent category or definition can affect many others.
Once you have an itemDefinition you can add it to an inventory component in the inspector window. All “Item” attributes can be inherited, modified or override directly in the inspector for the specific item instance that was added to the inventory.
All the items in the game is managed by an Inventory System manager. The manager will assign IDs to the items that are created at runtime and will have a reference to all ItemCategories, ItemDefinitions and Items. These can be fetched by ID or by name.
For more details, make sure to referer back to the previous post. It contains examples and gifs on how all this is done.
Coming up
In this update I will show some of the demo art and scripts. All of it will most likely change , especially the art and the UX, so don’t take anything to heart. I’ve been using the demo just to try things out so it’s not optimized and the UI looks a bit weird. The only purpose here is to show you the progress I’ve made so that you can give me feedback on the newly implemented features.
In case you haven’t read the previous posts, the demo is 2D with sprites. I’m inspiring myself from old school JRPG games, where you have a party of 4 characters each having their own equipment while sharing the party inventory.
The focus of this asset is the inventory and how the items are managed. It does not focus on wielding those items. There are some interactions that we do think useful though such as picking up items. But that’s only really for the demo and therefore 2D.
Once we start the UCC integration we’ll look into all the 3D stuff. This way by the time we’ll finish we’ll have a few examples of simple interactions, like itemPickup, working in both 2D and 3D.
Let’s start with a change in the attribute system
PreEvaluate
During our tests we found that using NCalc and Regex to evaluate the modify expressions of attributes is somewhat slow and creates garbage. So we decided to add a field to the attributes which lets you preEvaluate the attribute values in editor or once in game instead of reEvaluating the expression each time the modified attribute value is fetched. This is extremely useful for attributes on the ItemCategories and ItemDefinitions which shouldn’t change at runtime. It also works well for Immutable Item attributes. Now when it comes to mutable items it’s preferable to take another approach. Since the mutable item attribute can change at anytime preEvaluating the modified attributes will cause issues because an attribute may be dependent on an attribute which can change at any time. Therefore we suggest you to write your expressions directly in C# code instead of using the Modify feature. This also gives you a lot more flexibility.
Here is an example of using of using a static function to get the “Attack” power of a weapon which has a “BaseAttack” and a “Modifier” attribute.
C#:
public static int GetAttack(Item item)
{
   return Mathf.FloorToInt(item.GetAttribute<Attribute<int>>(ExampleDatabaseNames.Weapon.baseAttack).GetValue()
          * item.GetAttribute<Attribute<float>>(ExampleDatabaseNames.Weapon.modifier).GetValue());
}
If you are wondering what “ExampleDatabaseNames.Weapon” is, it’s a script that is auto-generated by the editor. It contains all the ItemCategory, ItemDefinition and attribute names of your InventorySystemDatabase in an organized manner. These are all constant strings.
Note that here we assume that the attributes “BaseAttack” and “Modifier” do exist on the item. If they do not we’ll get an error here.
You could check if the attributes exist before getting them
C#:
item.HasAttribute(ExampleDatabaseNames.Weapon.baseAttack) ?Or you could check if the item is part of a certain category to make sure the attributes do exist on the item.
C#:
if(InventorySystemManager.TryGetCategoryFromName(ExampleDatabaseNames.Weapon.name, out var weaponCategory))
{
   weaponCategory.InherentlyContains(item.ItemDefinition) ?
}
As explained previously the categories specifies the attributes which its items must have. Therefore if a category inherently contains an item that item must have all the attributes specified by it. In this case “BaseAttack” and “Modifier”.
Last edited:
Part 2: Inventory + Item Actions
Inventory and item actions are components that I introduced during the last post. But a few things have changed. I hope that you will find the changes to be quite useful.
Inventory and itemCollections
The inventory is a component that you add on a playable character, NPC, chest, shop, etc… to give them a collection of items. The inventory is simply an array of ItemCollection. Having multiple collections in one inventory is useful to keep some items separate. For example, you may want to have a main itemCollection and an equipment itemCollection in a single inventory. This is a great way to keep things organized.
ItemCollections are often used in the UI scripts to display the items it contains. Of course you can filter the items per category or per definition. But sometimes you want to have more control over the states of your items, so it’s important to split up your inventory in a way that makes sense for your game.

In the image above we see the demo inventory for the party of characters. Where we split the inventory in 5 ItemCollections.
ItemCollections have the logic for adding, removing, exchanging items. You may have different restrictions for an ItemCollection, for example limiting each item count to 99 items or not accepting to store an item of a specific category. For that reason, you can extend the ItemCollection class and change the type of ItemCollection for each ItemCollection in an inventory.
A good use case would be to have a main Collection of the default type with all the items and a “Equipement” ItemCollection which only allows equippable items and limit the number of weapons or armors that can be inside the itemCollection.
Note that the Inventory requires at least one ItemCollection and the first ItemCollection in the list is tagged as “Main” itemCollection. The reason for this is that most components that will interact with the inventory like: shops, storages, chests, pickups, etc… will either use all the ItemCollections in the inventory or just the first one. Of course that’s the default behavior and you’ll be allowed to override those defaults to do whatever you want
ItemActions
Item actions are used to process items to give a certain result. Here we are talking about using items and not wielding an item. Wielding an item is something the Character controller should deal with, example attacking with a sword. On the other hand, Restoring health when using an item can be considered an ItemAction. Although, If the character needs to have the potion in his hand and do a drinking animation then that’s wielding.
I hope the difference makes sense, We’ll try to make this distinction crystal clear once we start the UCC integration as it specifies what system should be taking charge these things.
An example of item action could be “Consume”, “Equip”, “Drop”, etc… Most of the time these are actions you can perform on an item from a UI when viewing an inventory.
That being the case we wanted to add some functionality to easily map an itemAction to a UI Button or keyboard button. To do that we use CategoryItemActions, which is an object that lets you set a list of actions that can be performed on an item of a certain category. Example “Drop” can be done on all “Viewable” items, “Equip” can be done on all equippable items and “Consume” can be done on all Consumable items.
Here is an example for the Viewable category Item Actions:

As you can see here we have a Dropdown to choose an Item action type

Using the drop down you can choose any type of itemActions. Any class deriving from ItemAction will automatically be added to that dropDown. These ItemAction will be written by you most of the time so that you can get exactly the functionality you want.
Let’s look at an example of a Drop Action. We need a few extra things apart from the affected item and the inventory that contains it. We’ll need
As you can see we inherit from a class called JRPGPartyItemAction which inherits from ItemAction. The JRPGPartyItemAction is just an abstraction layer to set a reference to the MainParty since that reference is used by multiple actions.
The action has three steps:
As you see above ApplyAction does not return any value. So what if you need to get a value from the ItemAction? For example, what if you wanted to get the spawn position of the last dropped item. You could save that position in a variable within the DropItemAction and then simply add a getter. As long as you know the type of your action you should be able to get any of the values you want.
So in action this is the result:

As you can see above some items have different actions available. The potion can be consumed and the bag can be opened.
Here we consume a potion and tell which character consumes it, healing 5 HP specified by the potion “HealAmount” attribute

Here we open a bag containing 22 Big swords (I’ll talk about item containing other items later in this update)

If there are any ItemActions that you are unsure how you would implement using this framework please let us know, It’s very important that we don’t miss any edge cases.
Also if you feel that some ItemActions should come out of the box by default or with the UCC integration do let us know, we’ll take note.
Inventory and item actions are components that I introduced during the last post. But a few things have changed. I hope that you will find the changes to be quite useful.
Inventory and itemCollections
The inventory is a component that you add on a playable character, NPC, chest, shop, etc… to give them a collection of items. The inventory is simply an array of ItemCollection. Having multiple collections in one inventory is useful to keep some items separate. For example, you may want to have a main itemCollection and an equipment itemCollection in a single inventory. This is a great way to keep things organized.
ItemCollections are often used in the UI scripts to display the items it contains. Of course you can filter the items per category or per definition. But sometimes you want to have more control over the states of your items, so it’s important to split up your inventory in a way that makes sense for your game.
In the image above we see the demo inventory for the party of characters. Where we split the inventory in 5 ItemCollections.
ItemCollections have the logic for adding, removing, exchanging items. You may have different restrictions for an ItemCollection, for example limiting each item count to 99 items or not accepting to store an item of a specific category. For that reason, you can extend the ItemCollection class and change the type of ItemCollection for each ItemCollection in an inventory.
A good use case would be to have a main Collection of the default type with all the items and a “Equipement” ItemCollection which only allows equippable items and limit the number of weapons or armors that can be inside the itemCollection.
Note that the Inventory requires at least one ItemCollection and the first ItemCollection in the list is tagged as “Main” itemCollection. The reason for this is that most components that will interact with the inventory like: shops, storages, chests, pickups, etc… will either use all the ItemCollections in the inventory or just the first one. Of course that’s the default behavior and you’ll be allowed to override those defaults to do whatever you want
ItemActions
Item actions are used to process items to give a certain result. Here we are talking about using items and not wielding an item. Wielding an item is something the Character controller should deal with, example attacking with a sword. On the other hand, Restoring health when using an item can be considered an ItemAction. Although, If the character needs to have the potion in his hand and do a drinking animation then that’s wielding.
I hope the difference makes sense, We’ll try to make this distinction crystal clear once we start the UCC integration as it specifies what system should be taking charge these things.
An example of item action could be “Consume”, “Equip”, “Drop”, etc… Most of the time these are actions you can perform on an item from a UI when viewing an inventory.
That being the case we wanted to add some functionality to easily map an itemAction to a UI Button or keyboard button. To do that we use CategoryItemActions, which is an object that lets you set a list of actions that can be performed on an item of a certain category. Example “Drop” can be done on all “Viewable” items, “Equip” can be done on all equippable items and “Consume” can be done on all Consumable items.
Here is an example for the Viewable category Item Actions:
As you can see here we have a Dropdown to choose an Item action type
Using the drop down you can choose any type of itemActions. Any class deriving from ItemAction will automatically be added to that dropDown. These ItemAction will be written by you most of the time so that you can get exactly the functionality you want.
Let’s look at an example of a Drop Action. We need a few extra things apart from the affected item and the inventory that contains it. We’ll need
- A prefab which we’ll spawn when dropping an item
- A position where we’ll spawn that prefab
C#:
[System.Serializable]
public class JRPGDropItemAction : JRPGPartyItemAction
{
   [SerializeField] protected GameObject m_PickUpItemPrefab;

   protected ItemCategory m_ViewableCategory;
   protected ItemPickup m_ItemPickup;

   public ItemPickup ItemPickup => m_ItemPickup;

   public override void Initialize(JRPGMainParty party)
   {
       base.Initialize(party);
       InventorySystemManager.TryGetCategoryFromName(ExampleDatabaseNames.Viewable.name, out m_ViewableCategory);
   }

   protected override bool CanApplyInternal(Item item, InventoryBase inventory)
   {
       return m_ViewableCategory.InherentlyContains(item.ItemDefinition)
              && m_SelectedParty != null
              && inventory.MainItemCollection.HasItem(item);
   }

   protected override void ApplyActionInternal(Item item, InventoryBase inventory)
   {
       inventory.MainItemCollection.RemoveItem(item);
       m_ItemPickup = GameObject.Instantiate(m_PickUpItemPrefab,
           m_SelectedParty.transform.position + new Vector3(Random.value*2-1,Random.value*2-1,0),
           Quaternion.identity).GetComponent<ItemPickup>();

       var itemObject = m_ItemPickup.ItemObject;
       itemObject.SetItem(item);
   }
}


public abstract class JRPGPartyItemAction : ItemAction
{
   protected JRPGMainParty m_SelectedParty;

   public JRPGMainParty SelectedParty => m_SelectedParty;


   public virtual void Initialize(JRPGMainParty party)
   {
       base.Initialize();
       m_SelectedParty = party;
   }
}
As you can see we inherit from a class called JRPGPartyItemAction which inherits from ItemAction. The JRPGPartyItemAction is just an abstraction layer to set a reference to the MainParty since that reference is used by multiple actions.
The action has three steps:
- Initialize(...):
- This is an important step that is specific to each ItemAction. This is where you set up the variable used by the action. In our case we want to specify the MainParty as we’ll use it to get the spawn position. You can imagine that if you had multiple players dropping items they could use the same ItemAction and initialize it each time before using it.
- CanApply(Item, Inventory):
- Can apply will let you know whether the ItemAction can be performed on the item you specified. This is useful in case you want to grey out a button in case the action can not be applied for some reason. In our example we check that the party is not null and that the item is part of the Viewable category.
- ApplyAction(item, inventory):
- This is where you perform the action. In our example we remove the item we are about to drop from the inventory, We spawn the item in proximity of the player and we assign the item dropped to the ItemPickup that was just spawned.
As you see above ApplyAction does not return any value. So what if you need to get a value from the ItemAction? For example, what if you wanted to get the spawn position of the last dropped item. You could save that position in a variable within the DropItemAction and then simply add a getter. As long as you know the type of your action you should be able to get any of the values you want.
So in action this is the result:
As you can see above some items have different actions available. The potion can be consumed and the bag can be opened.
Here we consume a potion and tell which character consumes it, healing 5 HP specified by the potion “HealAmount” attribute
Here we open a bag containing 22 Big swords (I’ll talk about item containing other items later in this update)
If there are any ItemActions that you are unsure how you would implement using this framework please let us know, It’s very important that we don’t miss any edge cases.
Also if you feel that some ItemActions should come out of the box by default or with the UCC integration do let us know, we’ll take note.
Last edited:
Part 3: Currency + Shop
Currency and shops are quite tricky because there is such a diversity of ways they can be implemented and some games may need a very special currency & shop implementation.
So we decided to go with something very flexible and extendable so that you can customize things to your need. By design a currency can be anything, int, float, arrays, etc…
But for most people that’s too general so we decided to implement our own CurrencyObject class which is what people will use by default. Of course if it does not suit your needs you can implement your own currency and extend the base implementation for shops and currency holder.
Generic Currency Holder
A currencyHolder is a component that holds your generic currency type.
It has abstract methods for
This are self explanatory except maybe PotentialQuotient. This lets you know how many times the provided currency amount can fit in the currentAmount. Or simply currentAmount/providedAmount = (int)quotient
I use this to know in advance how many times I can buy a specific Item with the currency amount we have in our CurrencyHolder.
With the currencyHolder you can completely customize the type of currency you use and how it is stored.
Generic Shop
The generic shop class is dependent on the currencyType being used
The shop class has functions:
And you have some abstract methods:
As you can see to buy or sell an item you’ll need to specify the inventory which contains the item, the currencyHolder, the item and an amount.
With this the shop script can check that everything is in order so that you can buy/sell and item no matter the type of currency you are using. You can even affect the buy price and sell price of all the items for that shop and buyer/seller with modifiers.
The shop has an inventory. By default the shop inventory will contain the items that the shop owner is selling. When someone buys an item from a shop the bought item will be a duplicate from the one inside the shop inventory. You could add the items being sold manually in the inspector or you could populate the shop inventory on start.
If you want a dynamic shop inventory where the items being sold/bought by the playing are being added/removed from the shop inventory that could be easily implemented by overriding some of the shop default methods.
So now we’ve seen how the currencyHolder and Shop can be used with any type of currency whether its int, float, arrays or anything really.
So what’s the default currency type that we went with?
CurrencyCollectionAmount
The currency we use by default, and that we believe will be useful for the majority of people is currencyColletionAmount.
*Important* Note that “currency” from ‘currency’CollectionAmount is not the same as the currency I was talking about until now. If you have a suggestion for a better name please let us know.
So what is a currencyCollectionAmout it is a collection of amounts of currency which are organized and stored in a logical way.
The collection is an array, the amount is an integer and the currency is of type Currency.
Currency
Currency is a scriptable object which contains some useful information on the currency object. They can be created in the Editor window:

Here we see the demo database currencies with Bronze, Silver, Gold and Gems. Silver is selected. We have fields for
Using the parent child relationship the currencies can get the exchange rate to any currency that is part of the same family. This is shown in the “Relationship” section.
In the example above, we have a “Bronze -> Silver -> Gold” branch and a “Gem” branch. That means the root currencies are Bronze and Gem. Currencies that do not have the same root cannot be converted to one another. If you want all currencies to be interchangeable you’ll need to define a single root of currency.
Currency as attributes
Once you have defined your currencies you can specify them on your item attributes. In the demo we have a Sell and Buy Item Category which have a “Sell Price” and “Buy Price” ItemDefinition attribute:

As you can see we are using an array of amounts of currencies as attribute. This can easily be used to add, remove or set some amount of currencies to a currencyAmountCollection.
Currency and shop summary
We put pricing to items using arrays of currencyAmounts as attributes. The shop uses that currencyAmountCollection as currency and therefore the currencyAmount arrays on the items are converted to currencyAmountCollection when needed.
The Pricing can be modified by the shop or even by external entities such as the seller/buyer.
Using all this in action we get something like this:
Currency and shops are quite tricky because there is such a diversity of ways they can be implemented and some games may need a very special currency & shop implementation.
So we decided to go with something very flexible and extendable so that you can customize things to your need. By design a currency can be anything, int, float, arrays, etc…
But for most people that’s too general so we decided to implement our own CurrencyObject class which is what people will use by default. Of course if it does not suit your needs you can implement your own currency and extend the base implementation for shops and currency holder.
Generic Currency Holder
A currencyHolder is a component that holds your generic currency type.
C#:
public abstract class CurrencyHolder<CurrencyT> : CurrencyHolderBase,It has abstract methods for
- Bool AddCurrencyInternal(CurrencyT amount)
- Bool RemoveCurrencyInternal(CurrencyT amount)
- Bool SetCurrencyInternal(CurrencyT amount)
- Bool HasCurrency(CurrencyT amount)
- Int PotentialQuotientFor(CurrencyT amount)
This are self explanatory except maybe PotentialQuotient. This lets you know how many times the provided currency amount can fit in the currentAmount. Or simply currentAmount/providedAmount = (int)quotient
I use this to know in advance how many times I can buy a specific Item with the currency amount we have in our CurrencyHolder.
With the currencyHolder you can completely customize the type of currency you use and how it is stored.
Generic Shop
The generic shop class is dependent on the currencyType being used
C#:
public abstract class Shop<CurrencyT> : MonoBehaviourThe shop class has functions:
- bool BuyItem(InventoryBase buyerInventory, CurrencyHolder<CurrencyT> currencyHolder, Item item, int amount)
- bool SellItem(InventoryBase sellerInventory, CurrencyHolder<CurrencyT> currencyHolder, Item item, int amount = 1)
- bool IsItemBuyable(Item item)
- bool CanBuyerBuyItem(InventoryBase buyer, CurrencyHolder<CurrencyT> currencyHolder, Item item, int amount)
- Float GetBuyModifierForBuyer(InventoryBase buyer)
- Bool IsItemSellable(Item item)
- bool CanSellerSellItem(InventoryBase seller, CurrencyHolder<CurrencyT> currencyHolder, Item item, int amount)
- float GetSellModifierForSeller(InventoryBase seller)
And you have some abstract methods:
- bool TryGetBuyValueForBuyer(InventoryBase buyer, Item item, int amount, ref CurrencyT buyValue)
- bool TryGetSellValueForSeller(InventoryBase seller,Item item, int amount, ref CurrencyT sellValue)
As you can see to buy or sell an item you’ll need to specify the inventory which contains the item, the currencyHolder, the item and an amount.
With this the shop script can check that everything is in order so that you can buy/sell and item no matter the type of currency you are using. You can even affect the buy price and sell price of all the items for that shop and buyer/seller with modifiers.
The shop has an inventory. By default the shop inventory will contain the items that the shop owner is selling. When someone buys an item from a shop the bought item will be a duplicate from the one inside the shop inventory. You could add the items being sold manually in the inspector or you could populate the shop inventory on start.
If you want a dynamic shop inventory where the items being sold/bought by the playing are being added/removed from the shop inventory that could be easily implemented by overriding some of the shop default methods.
So now we’ve seen how the currencyHolder and Shop can be used with any type of currency whether its int, float, arrays or anything really.
So what’s the default currency type that we went with?
CurrencyCollectionAmount
The currency we use by default, and that we believe will be useful for the majority of people is currencyColletionAmount.
*Important* Note that “currency” from ‘currency’CollectionAmount is not the same as the currency I was talking about until now. If you have a suggestion for a better name please let us know.
So what is a currencyCollectionAmout it is a collection of amounts of currency which are organized and stored in a logical way.
The collection is an array, the amount is an integer and the currency is of type Currency.
Currency
Currency is a scriptable object which contains some useful information on the currency object. They can be created in the Editor window:
Here we see the demo database currencies with Bronze, Silver, Gold and Gems. Silver is selected. We have fields for
- Name
- Base currency or parent currency
- Base currency exchange rate:
- It is required for the exchange rate to be higher than 1. It is of type double so it can be a fraction. It is used when converting a currency amount to another.
- Short Name
- That’s in case you prefer using text to display amounts of currency instead of an icon
- Icon
- Color
- Used for organization in the editor
- Max amount
- The default max amount of currency amount a currencyAmountCollection should contain (can be overriden)
- Overflow to first child when possible
- This probably needs some renaming. When true the currencyAmountCollection will know that the currency needs to automatically be converted to it’s child currency when the exchange rate allows to have at least one amount of child currency. Example instead of adding 1200Silver to a currencyAmountCollection will automatically be converted to 1Gold and 200Silver.
Using the parent child relationship the currencies can get the exchange rate to any currency that is part of the same family. This is shown in the “Relationship” section.
In the example above, we have a “Bronze -> Silver -> Gold” branch and a “Gem” branch. That means the root currencies are Bronze and Gem. Currencies that do not have the same root cannot be converted to one another. If you want all currencies to be interchangeable you’ll need to define a single root of currency.
Currency as attributes
Once you have defined your currencies you can specify them on your item attributes. In the demo we have a Sell and Buy Item Category which have a “Sell Price” and “Buy Price” ItemDefinition attribute:
As you can see we are using an array of amounts of currencies as attribute. This can easily be used to add, remove or set some amount of currencies to a currencyAmountCollection.
C#:
bool AddCurrency(CurrencyAmount[] currencyAmounts, float multiplier = 1, bool notify = true)Currency and shop summary
We put pricing to items using arrays of currencyAmounts as attributes. The shop uses that currencyAmountCollection as currency and therefore the currencyAmount arrays on the items are converted to currencyAmountCollection when needed.
The Pricing can be modified by the shop or even by external entities such as the seller/buyer.
Using all this in action we get something like this:
Part 4: Item Container + Save/Load
When I started looking into save and load for the inventory system I knew that the thing that would cause problems would be items referencing other items. Together with Justin we worked on making sure these items containing items could be serialized and deserialized correctly.
We still need to figure out a few things but the tests we’ve done so far show some promising results
Item Containers
Item Containers are items that contain other items. We name them as such but there is actually no difference between it and other items, apart from that it has at least one attribute that references another item whether its a Attribute<Item>, Attribute<Item[]>, Attribute<ItemCollection>, etc…
Some use cases for itemContainers could be
With the way we had the attributes implemented before it was not possible to have these serialize and deserialize correctly. But now we have a step in the deserialization of the item that also initializes (deserializes) each attribute within that item. That’s essential to deserialize items recursively or initialize an ItemCollection.
We also have a serialization step which again serialize bottom to top so that each item -> attribute<Item>.value -> attribute<...> -> etc.. is being serialized as you wish.
We are using the same Serialization class as the one used in the other Opsive assets. It needed some adjustments to allow all this to work, but as I said before the test we ran worked quite well.
In part 5 we’ll see how we can use an item with sockets to change its stats.
Save and Load
Once we figured out how to serialize items within items the save load feature is quite straightforward.
We wanted a save system that you could use for your items but also for the rest of your game, if you so choose. And we wanted to save to disk for run time use or inside scriptableObject for editor use.
You have three main parts.
There are still things we need to figure out for the saving of items. Especially when it comes to how much information needs to be saved. Some games would only need to save item IDs, some others may need to save dynamically create categories and definitions. Som may need to save items with their attributes. We’ll have to figure out something that suits most people's needs by default and allows a further customization.
When I started looking into save and load for the inventory system I knew that the thing that would cause problems would be items referencing other items. Together with Justin we worked on making sure these items containing items could be serialized and deserialized correctly.
We still need to figure out a few things but the tests we’ve done so far show some promising results
Item Containers
Item Containers are items that contain other items. We name them as such but there is actually no difference between it and other items, apart from that it has at least one attribute that references another item whether its a Attribute<Item>, Attribute<Item[]>, Attribute<ItemCollection>, etc…
Some use cases for itemContainers could be
- bags : itemCollection within an item so that you can save space in your inventory (depends on your game)
- Item with sockets: an item where you can attach other items to get power ups, effects, etc…
- Item referencing other item: weapons with ammunition. Example gun with bullets or bow with arrows
- And much more
With the way we had the attributes implemented before it was not possible to have these serialize and deserialize correctly. But now we have a step in the deserialization of the item that also initializes (deserializes) each attribute within that item. That’s essential to deserialize items recursively or initialize an ItemCollection.
We also have a serialization step which again serialize bottom to top so that each item -> attribute<Item>.value -> attribute<...> -> etc.. is being serialized as you wish.
We are using the same Serialization class as the one used in the other Opsive assets. It needed some adjustments to allow all this to work, but as I said before the test we ran worked quite well.
In part 5 we’ll see how we can use an item with sockets to change its stats.
Save and Load
Once we figured out how to serialize items within items the save load feature is quite straightforward.
We wanted a save system that you could use for your items but also for the rest of your game, if you so choose. And we wanted to save to disk for run time use or inside scriptableObject for editor use.
You have three main parts.
- Savers
- Savers are components you add next to the components you would like to save. For example, if you want to save your Inventory you can add a InventorySaver next to it.
Each saver object needs a unique key that should not change (otherwise the save data wouldn’t load). We are still looking for the best way, for now we use a combination of strings. “GameObjectName+ObjectType+keySpecifiedInInspector”
- Savers are components you add next to the components you would like to save. For example, if you want to save your Inventory you can add a InventorySaver next to it.
- SaveSystemManager
- The saveSystemManager takes in all the savers and schedules loads and saves when asked. You can set to load on start or to save on Application quite, etc…
Of course you can decide to save and load at anytime too.
- The saveSystemManager takes in all the savers and schedules loads and saves when asked. You can set to load on start or to save on Application quite, etc…
- SaveObject
- A save Object contains all data that is being saved. Once it is ready it can either be stored in a scriptable object or on disk.
There are still things we need to figure out for the saving of items. Especially when it comes to how much information needs to be saved. Some games would only need to save item IDs, some others may need to save dynamically create categories and definitions. Som may need to save items with their attributes. We’ll have to figure out something that suits most people's needs by default and allows a further customization.
Part 5: Equipping Items + Upgradable Items
Equiping Items
Equiping items can be really different between plenty of games. In the demo we wanted to do something simple that could scale up easily. So we decided to focus on adding a reference to the equipped item within the character script. It will be up to you to add a some behavior when an item is equipped such as changing the character sprite, changing the clothes of a 3D model, adding a weapon in the characters hands, etc… If we get a lot of requests of having some of these features built-in we may consider it. But we won’t have those at launch.
There is also a grey area here of how much would UCC be in charge of the equipping process.
In the demo each character can have 1 weapon, 1 armor and 1 accessory. These affect the character stats when equipped. Note that all this is purely for demonstration, you should have your own character stats and equip slots specific to your own game.
In part 2 of this post we talked about Inventories and ItemCollections. We said that you could divide your inventory in sections. For the demo I split in 5 sections
Since ItemCollections have an event whenever an item is added and removed I can simply hook each character to an ItemCollection by referencing the ItemCollection name or ID.
Then whenever an item of a certain category is added to an ItemCollection the respective character is alerted and it will store a reference to that item.
Since the character stats are dependent on the item stats, by swapping out equipped items the character stats will automatically be affected.
We can see this in action below
As you can see there is a little character icon next to the items that are equipped. We can tell the scroll view which items are equipped by who simply by checking which ItemCollection they are part of.
So how does the stat comparator work? For that you need the character script to have methods that will let you “Inspect expected values” by fetching what the stats of the character would be if an item was swapped by another without actually swapping it.
We haven’t plunged ourselves more into equipping because it's a complicated topic which will require extreme care so that it works well with character controllers such as UCC. Make to let us know exactly what you expect and want from the inventory system and the UCC integration so that we can plan accordingly
Upgradeable Items
Upgradeable items is something a few people asked for which had some relation with Item sockets. So I wanted to show that the framework was compatible with such requests.
First of all, any item that is set as mutable can have it’s attribute change at runtime, therefore you can change an “attack” attribute at anytime to power up a weapon. But what about something more complete such as enchanting weapons/armor or adding gems/runes to sockets of an item, which could change stats, name, etc...
There are multiple solutions to that problem.here are a few:
Option 3 requires a bit more work but it may be worth it depending on what you would like to achieve. In the demo I can upgrade weapons and armor with items called “Runes”. Runes have physical and magical modifier and a prefix and suffix attribute. I use the prefix/suffix attributes of the runes that are slotted in a weapon/armor within the “GetFullItemName” to find its full name. Similarly, I use the physical and magical modifier to change the values of physical attack and magical attack on weapons and physical defence and magical defense on armor respectively.
And just like that I can create any type of upgrade which will work for all the weapons and armor. Of course this is a specific use case but I hope that you see how you could twist it to your own needs
Here we can see it in action inside the demo
The fire rune has a prefix “Fire” and 4 physicalBoost and 2 magicalBoost
The magic rune has no prefix or suffix and has 0 physicalBoost and 5 magicalBoost
I use the same approach for the comparator here as I did for the character stats.
Just a reminder that character stats is something that you should implement yourself, here I am simply showing you some examples within the demo
Equiping Items
Equiping items can be really different between plenty of games. In the demo we wanted to do something simple that could scale up easily. So we decided to focus on adding a reference to the equipped item within the character script. It will be up to you to add a some behavior when an item is equipped such as changing the character sprite, changing the clothes of a 3D model, adding a weapon in the characters hands, etc… If we get a lot of requests of having some of these features built-in we may consider it. But we won’t have those at launch.
There is also a grey area here of how much would UCC be in charge of the equipping process.
In the demo each character can have 1 weapon, 1 armor and 1 accessory. These affect the character stats when equipped. Note that all this is purely for demonstration, you should have your own character stats and equip slots specific to your own game.
In part 2 of this post we talked about Inventories and ItemCollections. We said that you could divide your inventory in sections. For the demo I split in 5 sections
- (Main) shared inventory
- Maxi equipment
- George equipment
- Claire equipment
- Robert equipement
Since ItemCollections have an event whenever an item is added and removed I can simply hook each character to an ItemCollection by referencing the ItemCollection name or ID.
Then whenever an item of a certain category is added to an ItemCollection the respective character is alerted and it will store a reference to that item.
Since the character stats are dependent on the item stats, by swapping out equipped items the character stats will automatically be affected.
We can see this in action below
As you can see there is a little character icon next to the items that are equipped. We can tell the scroll view which items are equipped by who simply by checking which ItemCollection they are part of.
So how does the stat comparator work? For that you need the character script to have methods that will let you “Inspect expected values” by fetching what the stats of the character would be if an item was swapped by another without actually swapping it.
We haven’t plunged ourselves more into equipping because it's a complicated topic which will require extreme care so that it works well with character controllers such as UCC. Make to let us know exactly what you expect and want from the inventory system and the UCC integration so that we can plan accordingly
Upgradeable Items
Upgradeable items is something a few people asked for which had some relation with Item sockets. So I wanted to show that the framework was compatible with such requests.
First of all, any item that is set as mutable can have it’s attribute change at runtime, therefore you can change an “attack” attribute at anytime to power up a weapon. But what about something more complete such as enchanting weapons/armor or adding gems/runes to sockets of an item, which could change stats, name, etc...
There are multiple solutions to that problem.here are a few:
- Create an itemDefinition for each upgrade and convert an item to another. This could be done with crafting. This solution is only viable if you have simple upgrades and not too many items. It can become rapidly combursome to create upgrade items for each base weapon, armor and accessory definition.
- Directly change the values of the attributes of a mutable item. For example increase strength by x amount with each upgrade. That’s simple but it’s hard to back track as each upgrade overrides the previous one. You could have a prefix and suffix attribute and add them as you upgrade your item but you’ll have a hard time deciding how these are upgrades override or concatenate with each other
- Keep track of the upgrades that were done on the item. Such as having item slots for each upgrade. Then instead of changing the attribute values directly you can have an intermediate getter or “composite” getter. For example you can have an item “iron sword”, which has 3 itemSlots. When you add a “Majestic” upgrade to one of its slots you want it’s name to change to “Majestic iron sword”, and then if you add a “Fire” upgrade you want it to be called “Majestic fire iron sword”, and finally you want to add a “Doom” upgrade and your item should be called “Majestic fire iron sword of Doom”.
Instead of changing the actual name of the sword you can have composite getter such as a static function “GetFullItemName” that function could look at all the attributes in your item and get the ones required to compute its full name. With the same approach you could get the “attack”, “defence” and any other composite value you would like. The nice thing about this approach is that you can swap out upgrades, have special effects when two compatible upgrades are slotted on the same item, changes on the item attributes of the slotted item would also affect the main item, etc ...
Option 3 requires a bit more work but it may be worth it depending on what you would like to achieve. In the demo I can upgrade weapons and armor with items called “Runes”. Runes have physical and magical modifier and a prefix and suffix attribute. I use the prefix/suffix attributes of the runes that are slotted in a weapon/armor within the “GetFullItemName” to find its full name. Similarly, I use the physical and magical modifier to change the values of physical attack and magical attack on weapons and physical defence and magical defense on armor respectively.
And just like that I can create any type of upgrade which will work for all the weapons and armor. Of course this is a specific use case but I hope that you see how you could twist it to your own needs
Here we can see it in action inside the demo
The fire rune has a prefix “Fire” and 4 physicalBoost and 2 magicalBoost
The magic rune has no prefix or suffix and has 0 physicalBoost and 5 magicalBoost
I use the same approach for the comparator here as I did for the character stats.
Just a reminder that character stats is something that you should implement yourself, here I am simply showing you some examples within the demo
Part 6: Crafting + Recipes
Crafting
Crafting is an extremely broad term. There are millions of ways you could implement a crafting system and we want out inventory system to be flexible enough so that it leaves nothing out of the table. And the best way we found is to make it as simple and extensible as possible.
Crafting is split in two main parts. The recipes and the CraftingProcessor. The recipes contain the data the crating processor contains the logic.
Recipes
Recipes are scriptable objects that contain a list of “Ingredients” and “outputs”. By default the ingredients can be any combination of:
Both the CraftIngredients, CraftOutput and Recipe classes can be extended to suit your needs.
Recipes are organized in CraftingRecipeCategories, These are similar to the ItemCategories but slightly simpler. They are mainly used for organization purposes but can be useful to fetch a group of recipes.
For example you may have a crafting system where you unlock tiers of recipes bit by bit. You could categories you recipes per tier and by type to display the recipes that are available to your player.

Once we have created out recipe categories we can create our recipes (ignore the horrible layout I made both the editor tabs yesterday and did not focus on making it pretty):
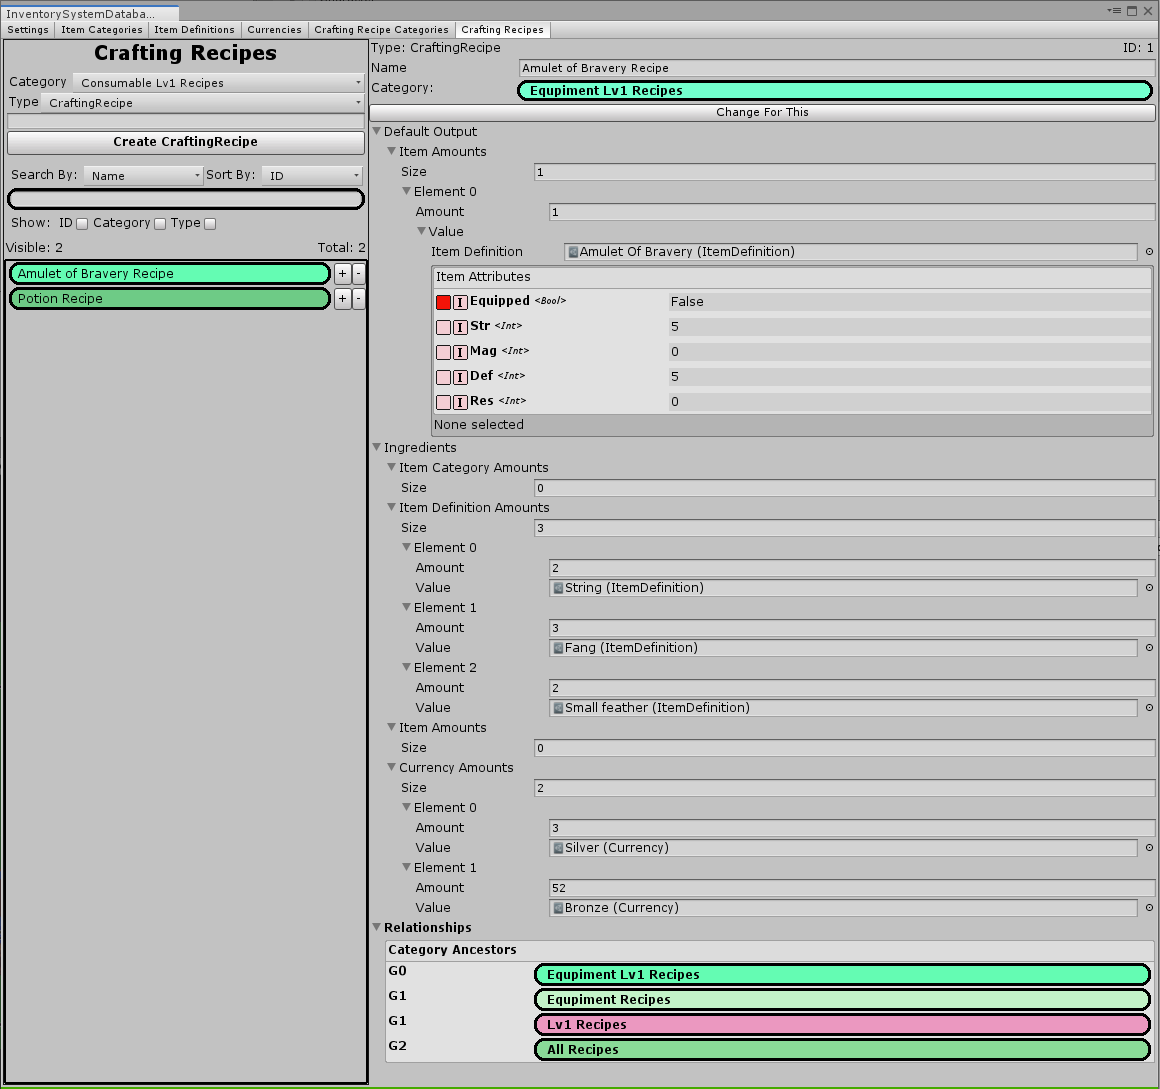
As you can see here we specify that to make an “Amulet Of Bravery” we require
Or on the other end of the spectrum you could specify an item as an ingredient where you could specify not only the ItemDefinition required but also the attribute values that are required by that item ingredients.
Once you have recipes the next thing to take into account is how these recipes are processed.
Crafting processor
The crafting processor takes a lot of inputs and gives you a result depending on those inputs. It is a simple as this:
We specify the recipe we are about follow, the items that are used as ingredients, the inventory where those ingredients come from and a quantity.
You can imagine that if you need more inputs such as: the character level, minigame score, placement of ingredients in a grid (mine craft like), etc… then you could initialize the craftProcess instance with those external effectors before you try to Craft.
In the demo we will only have a simple crafting solution where the items that are being used as ingredients are automatically fetched from the inventory using the recipe ingredients as reference.
Here is how it could work:

You’ll just have to believe me when I say that the crafted item is added in the inventory. In the example above we create 4 potions and 1 Amulet of bravery. As you can see we can disable the button when CanCraft returns false.
Hopefully this approach to crafting will give most people a solution that they could use out of the box. If we get a lot of requests for a particular crafting system we may look into implementing it. But if possible we would like people to extend the crafting modules to create their own take on a crafting system. As I am sure that you can all think of unique ideas that will make your games stand out.
Crafting
Crafting is an extremely broad term. There are millions of ways you could implement a crafting system and we want out inventory system to be flexible enough so that it leaves nothing out of the table. And the best way we found is to make it as simple and extensible as possible.
Crafting is split in two main parts. The recipes and the CraftingProcessor. The recipes contain the data the crating processor contains the logic.
Recipes
Recipes are scriptable objects that contain a list of “Ingredients” and “outputs”. By default the ingredients can be any combination of:
- ItemCategory Amounts
- ItemDefinition Amounts
- Item Amounts
- Currency Amounts
Both the CraftIngredients, CraftOutput and Recipe classes can be extended to suit your needs.
Recipes are organized in CraftingRecipeCategories, These are similar to the ItemCategories but slightly simpler. They are mainly used for organization purposes but can be useful to fetch a group of recipes.
For example you may have a crafting system where you unlock tiers of recipes bit by bit. You could categories you recipes per tier and by type to display the recipes that are available to your player.
Once we have created out recipe categories we can create our recipes (ignore the horrible layout I made both the editor tabs yesterday and did not focus on making it pretty):
As you can see here we specify that to make an “Amulet Of Bravery” we require
- 2 Strings
- 3 Fangs
- 2 Small Feathers
- 3 Silver + 52 Bronze
Or on the other end of the spectrum you could specify an item as an ingredient where you could specify not only the ItemDefinition required but also the attribute values that are required by that item ingredients.
Once you have recipes the next thing to take into account is how these recipes are processed.
Crafting processor
The crafting processor takes a lot of inputs and gives you a result depending on those inputs. It is a simple as this:
C#:
public abstract class CraftingProcessor

{

   public abstract bool CanCraft(CraftingRecipe recipe, InventoryBase baseInventory, List<ItemAmount> itemAmounts,

       int quantity = 1);


   public abstract CraftingResult Craft(CraftingRecipe recipe, InventoryBase baseInventory, List<ItemAmount> items,

       int quantity = 1);

}
We specify the recipe we are about follow, the items that are used as ingredients, the inventory where those ingredients come from and a quantity.
You can imagine that if you need more inputs such as: the character level, minigame score, placement of ingredients in a grid (mine craft like), etc… then you could initialize the craftProcess instance with those external effectors before you try to Craft.
In the demo we will only have a simple crafting solution where the items that are being used as ingredients are automatically fetched from the inventory using the recipe ingredients as reference.
Here is how it could work:
You’ll just have to believe me when I say that the crafted item is added in the inventory. In the example above we create 4 potions and 1 Amulet of bravery. As you can see we can disable the button when CanCraft returns false.
Hopefully this approach to crafting will give most people a solution that they could use out of the box. If we get a lot of requests for a particular crafting system we may look into implementing it. But if possible we would like people to extend the crafting modules to create their own take on a crafting system. As I am sure that you can all think of unique ideas that will make your games stand out.
Part 7: Conclusion and what’s next
I know this was long but I really hope that you all read through it and that you feel excited about the possibilities opening up for your games. There has been a lot of people requesting this inventory system to come out as soon as possible and we are working extra hard to make it happen.
There actually has been some major changes on the deliverables at launch. Previously I mentioned how I was going to make 3 demos. We scrapped that idea completely and we will make a single Demo scene for the Inventory System and that will be a fully 2D demo. The integration with UCC will have its own demo. After launch we may or may not revisit the idea of having other demos but for now that’s no longer the case.
The Next Big step
The next big step is of course the integration with UCC. I have just started discussing it with Justin. There are a lot of unknowns for now but I’m sure we’ll find a great solution for everyone.
The things we need to really lay down is which systems will be managed by which tool. I already discussed my viewpoint on that matter above. If you have any concerns, request or anything you would like us to take into account while we plan this up, please let us know.
As you can imagine this transition might require for either the inventory system, UCC or both to get refactored with breaking changes. What is sure is that making both these tools the best possible for the future will take priority over compatibility with previous versions. These changes could take a great deal of time to implement and since we haven’t made any decisions yet we have no idea how long it could take
On the side on the Inventory system we still have a lot of other things to worry about, such as documentation, cleaning the API, bug fixes, cleaning the Editor/Inspector layouts, making the demo pretty and easy to understand, etc… All of these things take a lot of time when combined together. Oh and I forgot usable UI for controllers not just with the mouse, and I’m probably forgetting other things which need to be done.
The launch features (subject to change)
At launch we want to give you the basic things that you can expect from any good inventory solution as well as the things that will make our system stand out.
With this you’ll get a complete baggage which should give you a great starting point to create your game inventory system.
The features coming later (subject to change)
Of course we are already thinking about how we could make our asset even better with advanced features such as
Again I insist if there is anything you want us to take into account while making this asset please let us know. I have a list of feature request which I go back to every now and then to make sure I take everything into account.
With this I wrap up the series of posts and I ask you to be patient. I’ll be making another post series like this next time I have something interesting to say. In the meantime, I hope you all the best with the development of your games!
I know this was long but I really hope that you all read through it and that you feel excited about the possibilities opening up for your games. There has been a lot of people requesting this inventory system to come out as soon as possible and we are working extra hard to make it happen.
There actually has been some major changes on the deliverables at launch. Previously I mentioned how I was going to make 3 demos. We scrapped that idea completely and we will make a single Demo scene for the Inventory System and that will be a fully 2D demo. The integration with UCC will have its own demo. After launch we may or may not revisit the idea of having other demos but for now that’s no longer the case.
The Next Big step
The next big step is of course the integration with UCC. I have just started discussing it with Justin. There are a lot of unknowns for now but I’m sure we’ll find a great solution for everyone.
The things we need to really lay down is which systems will be managed by which tool. I already discussed my viewpoint on that matter above. If you have any concerns, request or anything you would like us to take into account while we plan this up, please let us know.
As you can imagine this transition might require for either the inventory system, UCC or both to get refactored with breaking changes. What is sure is that making both these tools the best possible for the future will take priority over compatibility with previous versions. These changes could take a great deal of time to implement and since we haven’t made any decisions yet we have no idea how long it could take
On the side on the Inventory system we still have a lot of other things to worry about, such as documentation, cleaning the API, bug fixes, cleaning the Editor/Inspector layouts, making the demo pretty and easy to understand, etc… All of these things take a lot of time when combined together. Oh and I forgot usable UI for controllers not just with the mouse, and I’m probably forgetting other things which need to be done.
The launch features (subject to change)
At launch we want to give you the basic things that you can expect from any good inventory solution as well as the things that will make our system stand out.
- Inventory system Editor to create and manage your items
- Customizable items at runtime
- Inventory for everything and anything. Player, NPC, chest, etc…
- Currency and in game shops, supporting multi currency and auto currency conversion
- Basic Crafting system with possible extensions taken into account
- Item actions to allow any item to do anything
- The ability to equip and upgrade items, as well as item containers
- Save/Load system with Serializer (Serialization shared with UCC)
- Demo with UI controlled by mouse and controller
- Event system (shared with UCC Opsive)
- Object Pool system (shared with UCC Opsive)
With this you’ll get a complete baggage which should give you a great starting point to create your game inventory system.
The features coming later (subject to change)
Of course we are already thinking about how we could make our asset even better with advanced features such as
- Import export database of items
- Multi-language support
- Multiplayer (online) support
- Loading/Unloading items only when needed (to reduce load times)
- Integration with other third party assets
- And much more
Again I insist if there is anything you want us to take into account while making this asset please let us know. I have a list of feature request which I go back to every now and then to make sure I take everything into account.
With this I wrap up the series of posts and I ask you to be patient. I’ll be making another post series like this next time I have something interesting to say. In the meantime, I hope you all the best with the development of your games!
@Sangemdoko , still digesting the above and it looks absolutely amazing.
One thing has been bothering me and took me hours for the penny to drop - weighted loot tables?
One thing has been bothering me and took me hours for the penny to drop - weighted loot tables?
Haytam95
Active member
@Sangemdoko you and justin are doing an awesome work!
I've a question: The inventory component works with sockets (dictionary) or it's a reorderable list?

For example, here you could have the slot 1 empty, and the others full, or reorder the items in the slots. If the inventory is a list, you could order only the items (If you have 3 different items, you will always use slot 1, 2 and 3. Regardless the items order)
I've a question: The inventory component works with sockets (dictionary) or it's a reorderable list?
For example, here you could have the slot 1 empty, and the others full, or reorder the items in the slots. If the inventory is a list, you could order only the items (If you have 3 different items, you will always use slot 1, 2 and 3. Regardless the items order)
@Duffer123
Weighted loot tables is something I've looked into. To make it work I take advantage of an inventory ItemCollection. As mentioned before ItemCollections is an array of amounts of items. Instead of using it as a normal ItemCollection you can take that information of amounts + items to create a probability chart. The higher the amount the higher the probability it'll come out.
I actually have a random pickup in the demo scene that gives you a set of items with probability. You can see it in the gifs in the top right. I might look into different algorithms for a random item and item sets for chests and pickups. That's not a priority though
@Haytam95
In the demo we use an array. You are allowed to have [empty, empty, myAttachment, myOtherAttachement, empty]. Now if you want to order your attachments I think that comes with the logic of the UI. You can take the slot array within the item, order it and then display it. You could even apply that order change to the item.
We don't support dictionaries as attributes (our serializer won't serialize it), if you find a good use case though we may look into supporting it.
But for this specific use case, you could have two arrays: item[] and index[], where your index can be of type int, enum, etc...
Let me know if that answers your question.
@Sangemdoko , yes, I see - essentially so much can be leveraged (in so many different ways) from ItemContainer and ItemAttribute...
@Sangemdoko , in fact, I am even considering the use of this Asset to structure data for say RPG Races, SubRaces, Classes etc. ")
Also, please keep alive that idea (maybe on first release, maybe not) of being able to sync Item item attributes with third party component fields/properties of same type... think that would be a really big selling point and allow for a helluva lot of integration/extension....
Also, please keep alive that idea (maybe on first release, maybe not) of being able to sync Item item attributes with third party component fields/properties of same type... think that would be a really big selling point and allow for a helluva lot of integration/extension....
Last edited:
@Sangemdoko ,
Presumably you're still sticking to the same ItemCatrgory and ItemDefinition nesting and parenting structure?
I'm taking it from that that we'll be able to create unique items and in to say a Character inventory by mixing two or more ItemDefinitions at runtime too?
Presumably you're still sticking to the same ItemCatrgory and ItemDefinition nesting and parenting structure?
I'm taking it from that that we'll be able to create unique items and in to say a Character inventory by mixing two or more ItemDefinitions at runtime too?
@Duffer123
Sorry I'm not sure I understand your question, can you rephrase it or give an example?
Are you talking about Immutable and Mutable Items? what do you mean by "Mixing" ItemDefinitions?
Sorry I'm not sure I understand your question, can you rephrase it or give an example?
Are you talking about Immutable and Mutable Items? what do you mean by "Mixing" ItemDefinitions?
@Sangemdoko , so in runtime I want to create a new Item and I use say the ItemDefinition Longsword and the ItemDefinition Iron as sibling? ItemDefinitions or nested? to create the entirely new runtime Item called Iron Longsword?
Last edited:
@Duffer123
That's not a good way of going about it in my opinion. Your ItemDefinition need to have a category so your structure should be something around those lines:
Weapon -> Sword -> Long Sword
and
Material -> Metal -> Iron
If you wanted to define an "Iron LongSword" Definition in editor you could have
Weapon -> Sword -> LongSword -> Iron LongSword
Then you could create an Iron LongSword Item at runtime using the Iron LongSword ItemDefinition. You could set a crafting recipe:
1 LongSword + 1 Iron = 1 Iron LongSword
That approach is limited in scalability as it requires a lot of manual work if you have a lot of base items (Long Sword, Short sword, etc..) and extensions (Iron, Silver, etc...).
If you want to Create an Iron LongSword item at run time without an "Iron LongSword" ItemDefinition created in the editor, you can:
There are probably other options I haven't thought of just yet. Let me know if that's good or if you want us to look into having a more streamlined approach and if so, how would it work.
That's not a good way of going about it in my opinion. Your ItemDefinition need to have a category so your structure should be something around those lines:
Weapon -> Sword -> Long Sword
and
Material -> Metal -> Iron
If you wanted to define an "Iron LongSword" Definition in editor you could have
Weapon -> Sword -> LongSword -> Iron LongSword
Then you could create an Iron LongSword Item at runtime using the Iron LongSword ItemDefinition. You could set a crafting recipe:
1 LongSword + 1 Iron = 1 Iron LongSword
That approach is limited in scalability as it requires a lot of manual work if you have a lot of base items (Long Sword, Short sword, etc..) and extensions (Iron, Silver, etc...).
If you want to Create an Iron LongSword item at run time without an "Iron LongSword" ItemDefinition created in the editor, you can:
- Add Item sockets to your LongSword where you can add your Iron, and then follow the same approach as the upgrade system that I mention in part 5. That approach is the most extensible in my opinion
- Create an "Iron LongSword" ItemDefinition at runtime and then create your Iron LongSword Items from there. Essentially this approach is similar to the simple approach but it would be automated.
- Another approach is to add a "Prefix" attribute to the LongSword ItemDef and you simply set that attribute to Iron and maybe change some of the other LongSword attribute values. I'd say try to avoid this approach as it is a destructive approach compared to option 1, only use it if it makes sense for you.
There are probably other options I haven't thought of just yet. Let me know if that's good or if you want us to look into having a more streamlined approach and if so, how would it work.